Sunday, July 24, 2011

PTU Chances Are Tagger

This tutorial is created by Amanda Carter July 24th, 2011. This tutorial is my own creation so please don't copy and claim as your own. A link back is appreciated if you use it in your forums/groups.  Thank you.

Chances Are Tagger PTU Tutorial


Supplies needed:
PSP Program
Plugins- Eye Candy 5 Impact Extrude
Scrapkit Chances Are Tagger by BabyVDezign,this is a PTU and can be bought here.
Mask number 366 can be found here
Font of choice:Kozuka Mincho Pro L
Tube of choice, I am using FTU  Moonlight Serenitas by Ann Rigby which you can find her website here

Now let's begin:

Open a new image 400x400 transparent.
On a new layer flood fill a color of choice, I am picking a nice blue from the tube.
Open mask and apply your mask.
Layers merge group. Increase the size of the mask.
Open Frame2 and resize to about 15 percent. Copy and paste as a new layer. Move to the left side of the tag. Duplicate, image mirror. Merge down and then resize again about 95 percent this time.
Pick a paper from the kit, I picked paper 4.
With your wand, select your frames and paste the paper into selection, then select none.
Now resize your tube to your liking and put it in the frame, duplicate your tube and then image mirror and place beside the other tube.
Now add some elements, you can do mine as followed:
Butterfly 1 resize by 35 percent and place somewhere near the frame then image duplicate and mirror.
Flowerstamp 2 and place between the two frames.
Heartpillow resize by 35 percent and place somewhere near the bottom of the image duplicate and then image mirror.
Now go to the bottom of the layer where your mask is and place the bubbles on the mask. Rotate as seen on image using your pick tool, and then duplicate and image mirror then merge together.

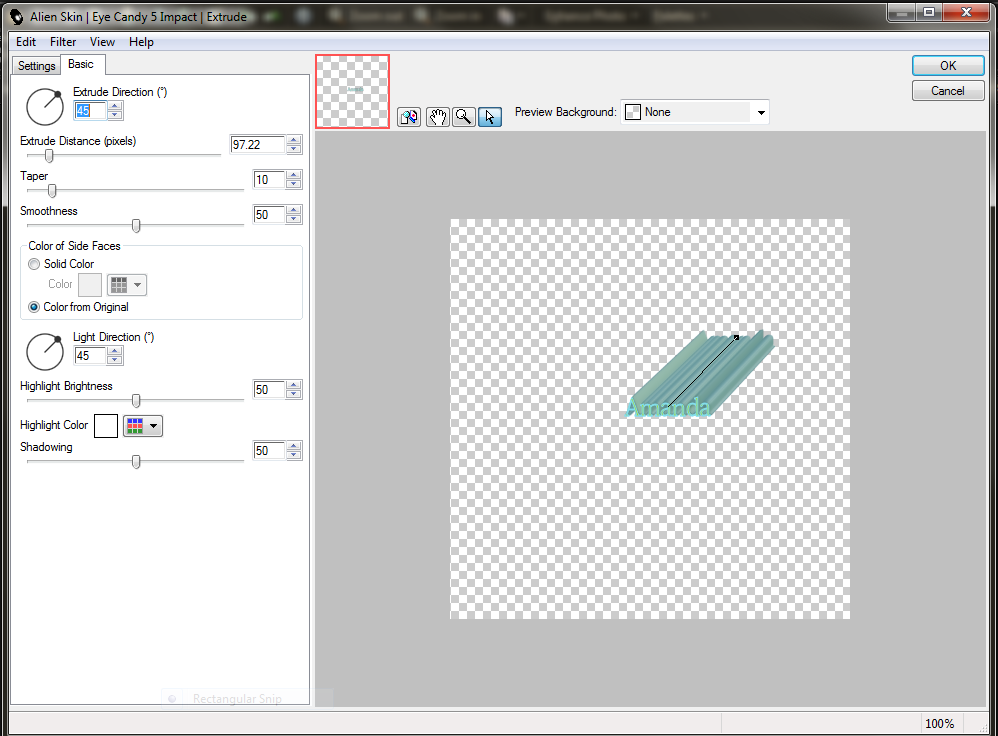
Now place your name, using colors from the image and place where it can be seen, and then use eye candy 5 impact Extrude with these settings:
Now that were done with this add your credits,watermark, merge together and save!!!

Thanks for doing this tutorial.


Wednesday, July 20, 2011

FTU Patriotic

This tutorial was created entirely by me.  Any resembles to other tutorials are pure conicidence.  Please don't copy this tutorial or claim as your own. If you would like you can link my tutorial to your site.  Now let's begin this tutorial.  This tutorial is for people that have knowlege of Paint Pro Shop and it's tools.

Materials needed:
PSP Program, I am using X3 but any other versions will do
FTU Patriotic scrapkit by Cryene, you may find her wonderful scrapkit here
Template number 104 located here
Mask 454 by Vix you can get it here
Plugins used Eye Candy 3 Gradient Glow and Bevel
Tube of choice I am using USAElliebear by Ellibabe, you can find her tube at http://PSPTube.Depot.com
Font of choice, I am using Edward Script size 25

Now let's begin!!!
Open template 104, and then delete the credits.
Select your stripes and color them with one of your papers from the scrapkit using select all, float and then defloat and then invert and delete.
Select the stars and select all and flood fill them with blue.
Then go to effects and select eye candy gradient glow with these settings:
Do the same for the larger stars.
Now on the Top stars do the same thing only change the color to yellow.
Now we are going to do the backs, pick a color from the scrapkit select all, float and then defloat and then invert delete.
Now were gonna do the Frames around the backs, select all, and then float. Then flood fill with a red.  Now the the Eye Candy again you gonna do the Bevel with the settings below:


Now it is time for your wordart.  Select all, float and then defloat and then pick another paper and then invert and then delete and then use your eyecandy gradient glow.
Now it is time to merge your frame and your backs. Then select all and add your tube of choice in each frame.  Drop shawdow of choice your tube.

Now add your text, using a paper from your scrapkit, and then do the eyecandy gradient glow settings as before.  Now remember to add all credit and copyrights and your done, and to merge all layers.

Thanks for doing my tutorial!!!

Sunday, June 26, 2011

PTU Sexy Grunge

This tutorial was created by Amanda Carter on June 26th of 2011. Any resemble to this tutorial is purely by accident.


Materials Needed:
Paint Pro Shop (I am using version X3.)
Scrapkit Sexy Grunge, this is a PTU scrapkit, you must have a license to use. You may find this scrapkit at this location.
Mask used is in this tutorial is Gems Mask 111 and can be found at this site http://Gemstagginscraps.blogspot.com.
Template I am using is called Star created by Vivian and dowloadable at this site http://creativemisfitscreations.blogspot.com/2011/06/new-templates.html.
Tube of choice I am using one of Anna Rigby's creations titled Nadya Tonya and her work can be found here at this site http://www.annarigby.com/
Font of choice I will be using...

Now let's begin our tutorial.

Please open your template, and close out the credits.
Select the yellow square and then select all, float and then defloat.
Then you will open your scrapkit and choose a paper ( I did paper 20, if you want it to look like mine, then find the papers I am using in the scrapkit or choose your own.)
 and then copy and paste, then paste as a new layer, hit invert and then delete. 
Then you will merge down.
Alittle hint you might wanna make all the star whites the same color I personally used paper 2.  Do the same with the stars also using Paper 18.

You will then do the same for the rest of the template until you are finished with the wordart, now with the wordart I have chosen paper 05.
We are then gonna add some gradient Glow using eye candy Gradient Glow from the impact collection number 5.
Here are the settings I am using..


If you can not see the settings real well they are
Glow Radius 10.00
Soften Corners 15.00
Opacity 100
Distort 12
Distort Lump 53
Gradient 49.

Then we will add the tube.
We will head back to the bottom where the square was and again select all, float and then defloat.
You will then copy and paste your tube, resize if needed.
I had to resize mine to 55%, then merge down.

We will now add some of the elements.
 I am gonna add element 03 to the first star resizing it to 25 percent.  I am putting it in the first star and the 3rd star.
Now I am gonna add another element. I am choosing element candle 1 and putting it in the second star, you might need to resize this one also. ( I resized mine to 40%).
This same candle I am putting in the other one also.
Now in the other 2 stars pick something different and make sure you resize them.
I am using element Charm01 and Charm02 in the other.
You will then merge them all.

Now it is time to add your text.
On a new layer type your text using colors that will stand out.
I am using Meiryo, size 26, using the colors from the wordart.
Then using the same settings are you did with the wordart go to your eyecandy 5 Impact Gradient Glow and then hit ok.
Layers merge visible, crop if needed.
You are now finished with this tutorial thanks for following me through it, please remember to put all credits on your finished product. If you used a PTU artist don't forget to put that information, thanks again for doing this tutorial with me.


Thursday, April 14, 2011

PTU Love Birds

Thank for you for trying my newest tutorial.  This one has to have some knowledge of Paint Pro Shop.  If this looks like anything like other tutorials, it is by pure conicidence.  This tutorial was written by Amanda Carter on April 14th,2011.  Now let's get started.


Supplies Needed:
Paint Pro Shop
PTU Scrapkit by Sleek n Sassy Designz sold at http://enchanteddreamsboutique.com/index.php?main_page=product_info&cPath=1_27&products_id=2340.
Mask by Vix, using number 447 can be found here.
Template #23 of the Valentine section can be found at http://amyleahsgimptastictuts.blogspot.com/search/label/Templates?zx=2a2c8bcec8925b85.
Font I am using is called Kinkee and located here.
Tube of choice, I am using art from Jakob Kramer and his gallery is found here, contact him about the use of his tubes and how to get them.

Now let's begin this tutorial.

Open your tube in Paint Pro Shop ( your gonna need it later).
Open your template.
Delete the credits.
Select the Oval, go to select all, float and then defloat.
Select a paper and paste as a new layer and then invert, then delete and merge down, make sure you select none. ( I picked paper 1)
 Now select circle2 and do the same as you did above only with a different paper.(ex: I picked paper 2).
Your gonna do that to the rest of them until you get to the hearts.

Now were gonna select each heart and do the same as above only we are gonna add some noise to them.  Make sure both hearts are the same color.  To add noise go to adjust, and then select the add/remove noise and we are gonna use these settings:  Uniform, 25, Monochrome checked.
Now we are gonna do the Love wording.  (Pick a bright color).  Do the same as above only change the settings to your noise. (I did mine, Uniformed, 30, with Monochrome picked.) (I also picked paper 3.)

Now we are gonna do the elements.
Go to Frame 4, and copy and paste as a new layer and resize as desired.(I resized by 45%).
Now add your tube inside the frame. (Resize as needed I resized mine to 25%, and put at the end of the word Love).
I then added the element 2hearts. Resize and then add to any corner of your tag.Then add a dropshawdow of choice. (I used settings.. H-3,V-3,Opacity25,Blur 3.00,Color Black)
Do the same thing with the cake element.

Now that you did that pick a paper and use that for your font color and place your text. Then dropshawdow it and then put some noise in it.
Go to your background,select all, then pick a paper and paste it into your selection, then select none.
Apply your mask, merge mask and then your done.(Remember to merge your layers together.)

Put your credits and copyright information and then your done.

Thanks for doing my tutorial.


Friday, April 8, 2011

PTU Emolicious

This tutorial was written by me,Amanda Carter on April 8,2011.  Any other tutorial that looks like this one is just by pure accident.  Thanks for trying my tutorial.


Supplies needed:
Paint Pro Shop (I am using PSPX3), if you need this program you can try it here.
Tube of choice, I am using a Popeye Wong tube you can find his site here.
PTU Scrapkit Emolicious by Stef's Scrapkits and you can buy it at http://scrappindollars.com/index.php?main_page=product_info&products_id=4682.
Template #369 by Divine Intentionz located here.
Mask of choice I am using OCA508SP. I found this at http://public.fotki.com/KuteSmile/resources_for_creating/psp-resources-variables/masks_frames_for_psp/ocaso8sp.html. (If you are the creater of this beautiful mask and have another link for download please feel free to e-mail me it so I can replace that link.)
Font of choice, I am using Enlighten found at http://mawns.blogspot.com/2011/03/blog-post_90.html.

Now let's begin our fun!!!!

Open your Paint Pro Shop program.
Open your tube (you will need this later in the tutorial).
Now we are going to open your template.
Delete the bymissy layer.
Highlight the stars layer.
Select all,float and defloat and flood fill with a color from your tube, then select none.

Now select Rebel2 and select all,float,defloat.
Pick a paper (I picked paper28) from your scrapkit,copy and paste as a new layer, your then gonna invert,delete,select none and merge down.
Now select the star and do the same thing as you did for Rebel2.

Now pick the other star and do the same as above only with a different paper.(I am using Paper27).
Now using the same paper as the star above do the same thing for Rebel1.
Keep the pixel wording the way it is.

Now we are gonna work on Frame2.
Select all,float and defloat, on a new layer pick a paper and then invert,delete merge down.(I am picking Paper1.) Use a different paper for the shawdow part. (I am using paper 26 for that part.)
Do the same as above for the rest of the layers, using different kinds of papers or the same kind your choice.(I did keep the a the way it was but it is up to you.) I also kept the back of the wordart white and the shawdow as is.

Now it is time to add your tube.
Go back to your Frameback and then select all,float and then defloat, then your gonna copy and paste your tube,invert and then delete.
Do the same for the other Frameback.
Select the background,select all, and then copy and paste a paper of choice (I am using paper 25)in the selection and then apply your mask.
Layers and merge group.

Now were gonna add your text.
I am using Enlighten size 30, colors any from your tag.

Now put in your license number if using a PTU tube artist and the other copyright information, and your done thanks for doing my tutorial. Remember to merge all layers together before saving.


Wednesday, April 6, 2011

PTU In the Moment

This tutorial was written by Amanda Carter on April 6,2011, any other tutorial that looks like this one is purely conicidence.  This tutorial is written with presumily some knowlege on Paint Pro Shop.


Supplies needed:
Paint Pro Shop (I have PSPX3)
Tube of choice, I am using SW422 Family Ties by Suzanne Woolcott and you can find her tubes http://www.gorjussarthome.com/store/index.php?main_page=index, you must have a license to use her tubes
PTU Scrapkit In the Moment FS by JTs Designs found at this site http://www.lollipopsngumdrops.net/store/index.php?main_page=product_info&products_id=2703, you must perchase this to use.
Mask of choice, I am using Monti's Jagged Heart located at this location http://www.montispixelplayground.com/Masks.html.
Font of choice.

Now let the fun begin...
Open your Paint Pro Shop Program
Open new image a 500 x 500 transparent.
Go to Raster 1 and flood fill with white.
Open Frame 1 from your scrapkit and resize to 10 percent, now place your frame anywhere on the canvas.I placed mine in the middle.
Pick a paper from your scrapkit and erase anything outside the frame, I am using paper 8. Make sure the paper is underneath the frame.
Now we are gonna open your tube and do the same thing as above,erase anything that hangs outside of the frame, and then put the tube in between the frame and your paper.

Now we are gonna add some of our elements.
Open one of your ribbons (or frame wraps) that will either match the frame or your tube, I am picking Frame Wrap and resize to fit your frame, erase anything that is hanging outta the frame.
Now pick another element and decorate to your hearts desire, just make sure you resize to fit your tag.

Now add your text, make sure you pick the colors that will look good on your tag, I am using font Lao UI 28.
Go to Raster 1, select all and pick a paper and paste it into the selection, then apply your mask.
Your now gonna add your copyright information and license numbers and your done, thanks for trying my tutorial.


Monday, April 4, 2011

My Kids

I have never posted my kids pics on a blog before until this day, my lovely kids are Richard age 5 (will be 6 in July) and Katherina age 3 will be age 4 next month.